
Templates#
A template is a file full of merge tags plus a configuration that says which record data it may use. This page covers creating templates, the formats, versions, the two in-app designers, cloning and export, and who sees which template.
Creating a template#
Open the Welisa DocGen app → Command Hub → Your Templates → the Create New tab. The wizard offers these paths:
- Start from a Design — a starter gallery: Record Report, Invoice / Line Items, Business Letter, a signature-ready Agreement, a landscape Certificate. Your object's real merge fields are dropped in automatically and the template renders on the first click. The fastest smoke test of a new org.
- Start from a Blank Canvas (Beta) — an empty artboard. Drop text, tables, images, charts, shapes, barcodes and signature blocks exactly where you want them and they land there in the PDF, to the inch. See Canvas templates.
- Start From Scratch — a blank page in the Visual Designer. Click anywhere and type; press the backtick key for the insert menu.
- Generate with AI — the wizard assembles a ready-to-paste prompt (your fields, the full tag syntax, the PDF engine's rules). Paste it into your AI assistant and paste the HTML it returns back into the wizard.
- I Have an Existing File — upload Word (
.docx), HTML (.html/.htm/.zip), fillable PDF, PowerPoint (.pptx, alpha) or Excel (.xlsx/.xlsm, alpha) containing{FieldName}merge tags. Each keeps its own format — Word generates.docxor PDF, Excel.xlsx, PowerPoint.pptx. An HTML file can also be imported onto a canvas later.
Every path then asks for:
- A Template Name (optionally an API Name and a Category under Advanced options).
- A base object — Account, Opportunity, Case, any custom object. Standard objects are ranked first with a green Standard pill, so the real
Opportunityalways tops the list even in orgs full of namespaced look-alikes. - The query — which fields and child relationships the template can use (Query configuration). On the design and AI paths a field checklist builds it for you.
- The default output format (PDF or the native format).
- An optional Sample Record, so previews and Download Sample show real data.
Output format by template type#
| Template type | Output |
|---|---|
Word (.docx) | PDF or DOCX — chosen when the template is saved |
| Canvas | PDF only |
HTML (.html, .htm, .zip) | PDF only |
| PDF (fillable form) | PDF only |
PowerPoint (.pptx) | PPTX only (the platform cannot convert PowerPoint to PDF) |
Excel (.xlsx / .xlsm) | XLSX / XLSM only |
One template → one output format. There is no runtime "output as" picker unless the template is unlocked (see Output format locking). To offer the same document as both PDF and DOCX, save the template twice.
Maximum template file size: 10 MB. Nearly every oversized template is uncompressed images. In Word, right-click an image → Compress Pictures → Email (96 ppi) or Web (150 ppi); most templates drop to 1–2 MB with no visible loss. See Limits.
Fillable PDF templates (AcroForm)#
Upload a fillable PDF form, read its fields in the browser and map each one to Salesforce data. The output stays a PDF: the mapped fields are filled server-side, so the same template runs for a single record, Generate Sample, Flow and bulk generation (Individual Files mode).
- Create or edit a template with Type = PDF and upload the
.pdf. - Open the Fillable Fields tab: the fields are listed in page/position order. Give each a human Label (the original PDF field name stays visible underneath).
- Pick a Data Path from the template query, or enter a static value.
- For checkboxes and radio buttons, map a boolean-like value and set Checked Value to the PDF's on-state when needed (
true,yes,1,checkedcount as checked). - Save as New Version — the mapping snapshot and a server-ready PDF body are stored together. Later edits to labels or mappings use Save Mapping on the same tab.
Designed for standard AcroForm PDFs, including government forms whose field dictionaries live in object streams. XFA-only or unusually encrypted forms may not work. Generated fields generally remain editable (output is not flattened). If the mapping no longer matches the active body, save the PDF as a new version.
API Name — a stable key for automation#
Every template has an optional API Name, a unique developer key such as Opp_Close_Summary. Flows reference it through the Template API Name input instead of a record Id, so automations survive sandbox-to-production deployments with nothing to remap. Letters, numbers and underscores; must start with a letter; unique when set; may be blank. The create wizard auto-fills it from the name (Opp Close Summary → Opp_Close_Summary); cloning gives the copy its own key; export/import carries it across orgs unless the target already uses it.
The Visual Designer#
HTML templates open in a full WYSIWYG designer — the page you see is the page that renders. Merge tags appear as purple pills (loop and section markers in green) that move and delete as single objects, so tag syntax cannot be half-mangled while editing.
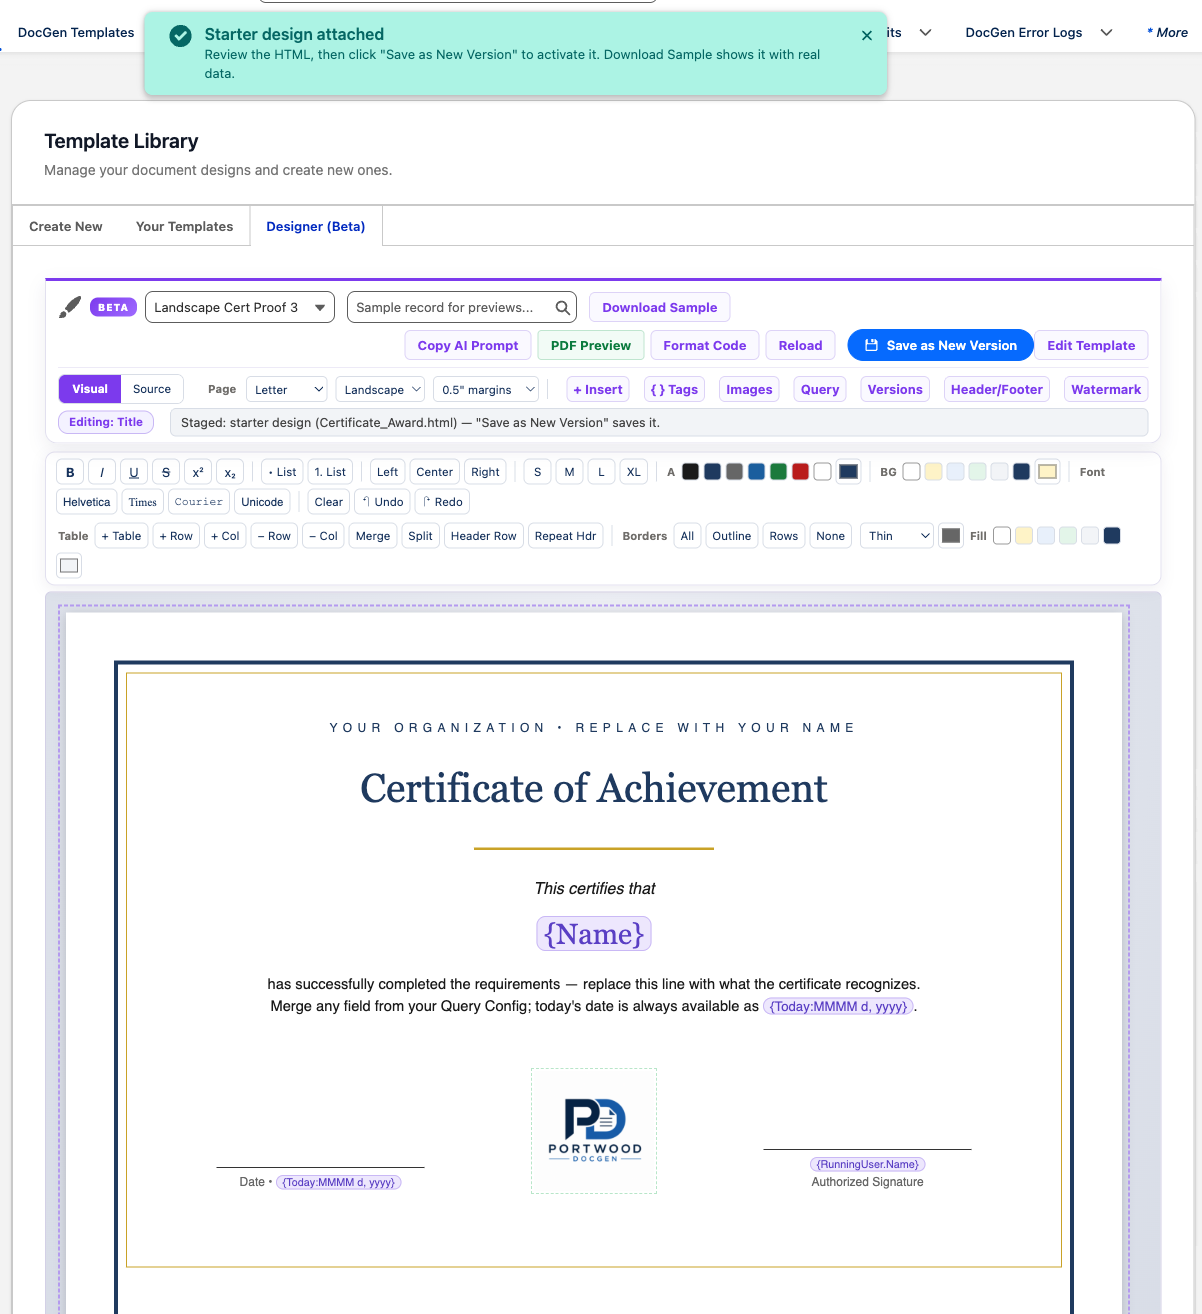
Around the canvas
- Toolbar — Download Sample (a rendered PDF with your sample record), Copy AI Prompt, PDF Preview (opens your unsaved draft in the native viewer, nothing written to Files), Format Code, Reload, Save as New Version (the one way to activate edits) and Edit Template (the settings modal).
- Page setup — size, orientation and margins write a clean
@pagerule into the document. If your HTML declares its own@page, the engine defers to it. - Panels —
+ Insert(blocks, tables, charts, barcodes, special characters — or press the backtick anywhere),{} Tags(your query's merge fields as clickable chips), Images (the shared Asset Library), Query (edit fields without leaving the designer), Versions, Header/Footer, Watermark.
Text formatting — bold/italic/underline/strike, super/subscript, lists, alignment, an exact point-size box (6–96 pt) with steppers, text and highlight colours, font families, Unicode-safe special characters, undo/redo. Merge tags style like the text around them: a {Name} pill inside a 24 pt serif heading prints the merged value in 24 pt serif, and you can style a pill directly from the toolbar.
Tables — spreadsheet-level editing — drag any cell edge to resize columns (the neighbour gives way) or a bottom edge for row height; drag across cells to select a rectangle, then fill, merge or split; add/remove rows and columns, header rows, repeat-header for multi-page tables; borders with All / Outline / Rows / None styles, a thickness picker and a colour. Rows carry page-break-inside: avoid automatically, so a PDF page never splits mid-row.
Images — assets render as real images on the canvas; drag to move, drag the corner to resize (the size is written back into the tag), align Left/Center/Right, double-click to edit the underlying {%asset:logo:120x} tag. In header or footer HTML you can write <img src="{%asset:logo}">; unsized header/footer images are clamped to the margin box.
Watermark — upload a background image and pick a strength (Light 15 % / Medium 30 % / Strong 50 % / Original). The opacity is baked into the image at upload so canvas and PDF match. Needs a saved version first.
Right-click anywhere for a searchable menu of every insert and table action. The toolbar stays fixed while the document scrolls.
Generating a template with AI#
The Generate with AI path and the designer's Copy AI Prompt button produce the same brief: your fields, the complete merge-tag syntax and the PDF engine's layout rules. Paste it into the AI assistant your organisation uses, then paste the returned HTML into the wizard or the designer. The HTML templates page carries the prompt and the rules it encodes.
Welisa DocGen also exposes a global interface, welisa.DocGenAiProvider, so an org with its own model access (for example Einstein / Prompt Builder) can generate and revise templates from inside the designer:
global with sharing class MyAiProvider implements welisa.DocGenAiProvider {
    global Boolean isAvailable() { return true; }
    global String getName() { return 'Our AI'; }
    global String generateHtml(String prompt) {
        // Return a complete HTML document. It is validated against the PDF engine before anything is saved.
        return callOurModel(prompt);
    }
}
Point the package at it in Setup → Custom Settings → Welisa Settings: AI Provider Class = MyAiProvider (and AI Prompt Template if your provider uses a Prompt Builder template — a Flex template with one required Free Text input named Instructions, saved and activated). The provider is resolved in your namespace first. A provider must never make an HTTP callout from inside generation; reach your model through platform APIs. Everything the model produces is checked against the PDF engine: rgba() tints become flat hex, gradients become their first colour, ignored properties are removed, loop tags stranded between table rows are moved into cells, and any merge tag lost on an edit is reported by name. Talk to Welisa if you want this configured for a client.
Canvas templates (Beta)#
A Canvas template is a positioned document: you place blocks on an artboard measured in inches and they print exactly there. The other template types describe a flowing document and let the engine lay it out. Canvas is for the cases where that is not good enough — a certificate, a form that must match a printed original, an invoice whose totals panel belongs in one corner.
Choose Start from a Blank Canvas in the wizard, or open any Canvas template from Your Templates → Designer.
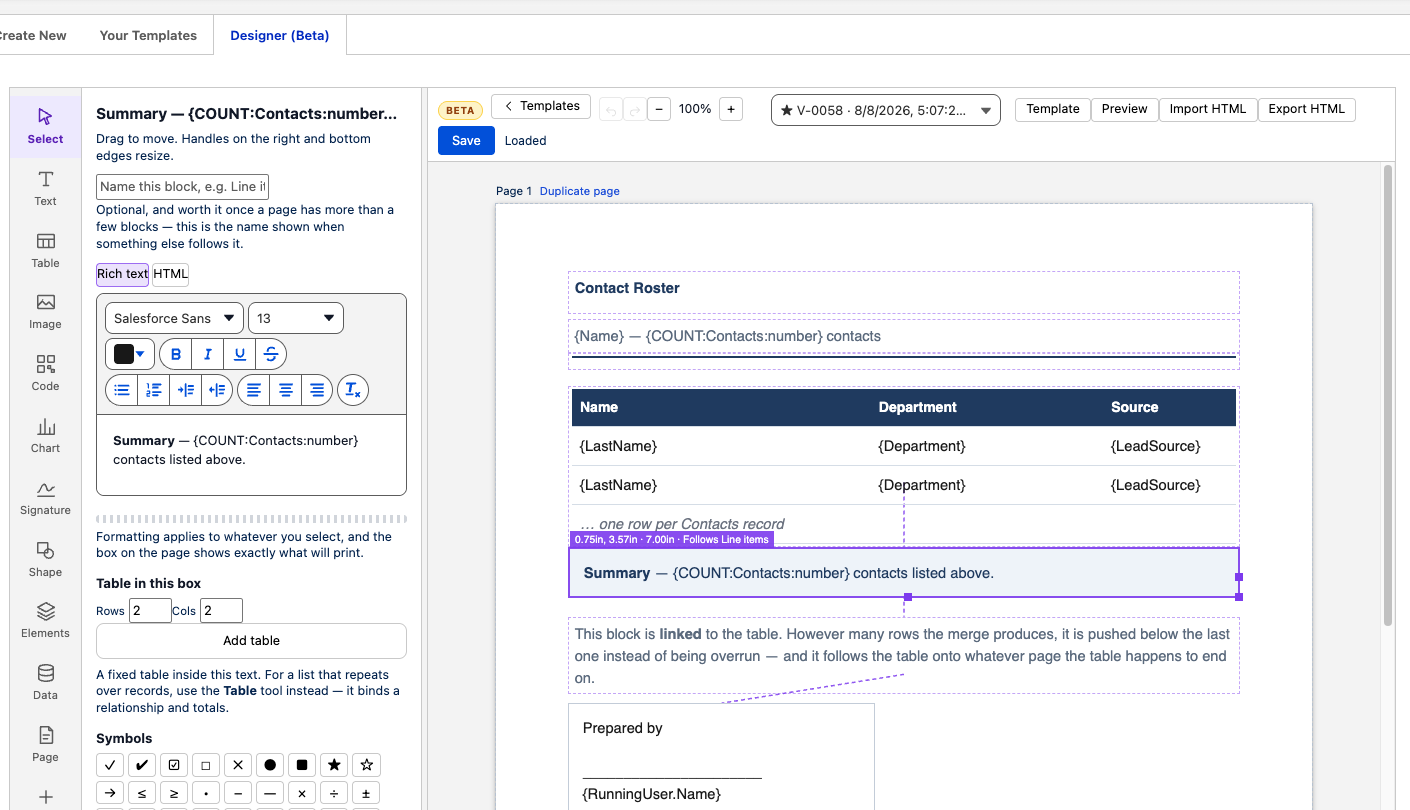
- Tool rail — Select, Text, Table, Image, Code (QR / barcode), Chart, Signature, Shape, Elements, Data, Page, Add page. Pick a tool, click the page to place a block.
- Properties panel — name, content (rich-text editor or HTML source), fill, border, padding, a Show only when condition, layering and position.
- Toolbar — Template settings, Preview (a real PDF from your sample record), Import HTML, Export HTML, the version picker, Save.
What you place is what prints. A box at 2.4 in × 3.1 in on screen is at 2.4 in × 3.1 in in the PDF. Page size, orientation and margins are set on the Page tool and written into the document's own @page rule; the template record's page fields do not override it.
Tables that grow. A Table block binds a child relationship from the Data tool and repeats one row per record. Column headers go in a real <thead> and repeat at the top of every page the table spans. Nested lists (an opportunity's products under each opportunity) and totals that add themselves up are supported.
Charts. The Chart block renders a live preview on the artboard and a real image in the PDF — pick a relationship, a field to group by and a style. It writes the same {Chart:…} tag you could author by hand (Charts).
Naming a block. Set a Name once a page has more than a few blocks: it is what the panel heading, the on-canvas badge, the Elements list and every Follows picker show. The Elements tool lists every block front to back and selects one on click — the way to reach a block sitting under a full-bleed background.
Element linking — blocks that travel together. A note placed under a table is fine on the artboard and wrong the moment the merge produces more rows than you drew. Set a block's Position:
- Stays put — lands exactly where you put it. Right for page furniture: masthead, logo, footer.
- Flows down the page — stacks below the previous flowing block and can spill onto the next page. Where a line-item loop goes.
- Follows another element — pick the block it should travel with. However far that block grows, this one lands below it and follows it onto whatever page it ends on. Links chain (summary follows table, note follows summary, signature panel follows note). Keep on the same page as what it follows stops a block being split across a page break, as long as it fits on a page.
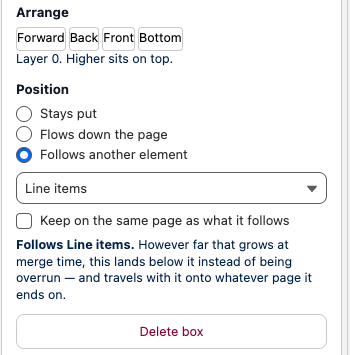
A block can only follow something on the same artboard, and the picker never offers a target that would create a loop. A dashed tether shows each link on the artboard.
Import and export. Import HTML converts an existing HTML document onto the canvas, one editable block per top-level element; elements already positioned absolutely in inches arrive placed, everything else arrives flowing. Export HTML downloads a self-contained file that can be imported again into another org or as the start of a second template.
Multiple pages. Add page appends an artboard; Duplicate page copies one with everything on it. A linked group lives on one artboard.
Known limits (Beta) — no running header or footer (use the template's Header HTML / Footer HTML fields for content that must repeat on every page); a linked group taller than a page still splits; links do not cross artboards; output is PDF only.
Template versions#
Each save creates a new Template Version. Only the version marked Active is used by the runner; older versions are kept for rollback. At save time the file's images are pre-extracted and the XML parts cached, so generation never has to unzip the template.
- Version-pinned render settings. Output Format, Header HTML, Footer HTML, Document Title Format, Page Size, Orientation, Margins and Custom Margins are snapshotted onto the version at save time. Rolling back to an older active version gives you the rendering that was authored then, not the template's current values.
- Changing a template's format (Word → HTML, say) requires uploading a new body in the new format and Save as New Version. A details-only save that changes the type is blocked, because the old body would keep rendering. If you uploaded a file but use a details-only save, the designer warns that the upload is not included — documents keep generating from the previous file until you Save as New Version.
- Deleting old versions. Template → Versions tab → Delete next to any non-active version; the version record and its cached files are removed in one go. The active version cannot be deleted — activate another first.
Cloning a template#
Your Templates → row menu → Clone copies everything in one click: the template record (settings, query config, signer inputs, e-signature defaults), the active version and its file, inline images, the watermark and saved queries. The copy is named "
Exporting and importing templates#
Your Templates → row menu → Export downloads a .docgen.json bundle with the template settings, the active version's file, referenced inline-image assets, the watermark and saved queries. Import Template (above the list) recreates the whole thing in any org; image URLs are rewritten to the new org's files and extraction re-runs on arrival. Only the active version travels; the API Name is preserved unless the target org already uses it.
Test record#
Set Test Record Id on the template to pin a specific record for previews and validation. The bulk runner also uses it to size the duplex-packet estimate.
Output format locking#
Tick Lock Output Format to prevent users from overriding the output format at runtime: the runner's PDF/Word toggle is hidden and an override from a Flow or the API throws a validation error. Use it for compliance-sensitive documents (signed contracts must always be PDF).
Template visibility#
Who sees a template in the picker is controlled on the template itself — deploy-safe and consistent across the runner, bulk runner, signature sender and Flow:
- Active — unticked hides the template from every picker while it stays editable in the Command Hub (shown with an Inactive badge). For seasonal or work-in-progress templates.
- Required Permission Sets (comma-separated names) — only users holding at least one of them see the template. The permission set does not need to grant anything; an empty "shell" set works as a membership token.
- Specific Record Ids (comma-separated) — only shown for those records.
- Record Filter (a SOQL
WHEREclause, e.g.StageName = 'Negotiation/Review' AND Amount > 10000) — shown or hidden by the record's values. Bulk generation applies it too.
All configured conditions must match for the template to appear.
Template sharing#
No sharing setup is needed: Welisa User includes read-only View All on templates, so every user sees every active template (narrowed by the visibility controls above). Write access stays with Welisa Admin, and field-level security is still enforced on merged data.
If your org needs share-controlled visibility, do not assign the packaged Welisa User set; clone its grants into your own permission set without View All on Welisa Template — those users then see only templates shared with them. Note that Required Permission Sets hides templates from pickers, not from the Welisa Templates object tab.
Picker order and grouping#
Templates are grouped by Category, the object's Default template floats to the top, and Sort Order (lower = higher) breaks ties. A category dropdown filters the list when you have many templates. All three are plain fields on the template's Settings tab.
Starting from the Welisa library or a sample#
Welisa maintains generic, Welisa-styled templates (quote, invoice, order confirmation, timesheet, NDA) for consultants to adapt. If you start from any sample or example body — Welisa's, a starter design's, or one you found elsewhere — replace the sample company text and remap every merge tag to the client's object before activating it; sample bodies carry fictional names, addresses and phone numbers.
Where to next#
- HTML templates — the PDF engine's CSS rules, page setup, headers and footers, images, loops.
- Word templates — table-width traps, AutoFit, inspecting a
.docx. - Query configuration — what data the template may use.
- Merge tag reference — every tag.